In this article you will learn how to set up your supplier master data manually into the SupplyOn System.
Click on Add Supplier
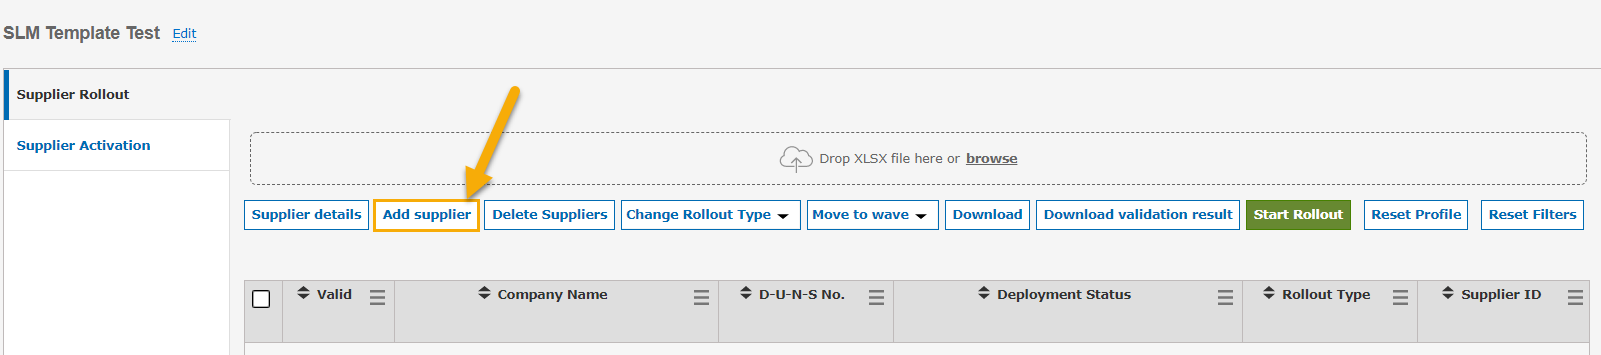
The following entry mask for the supplier data will appear:
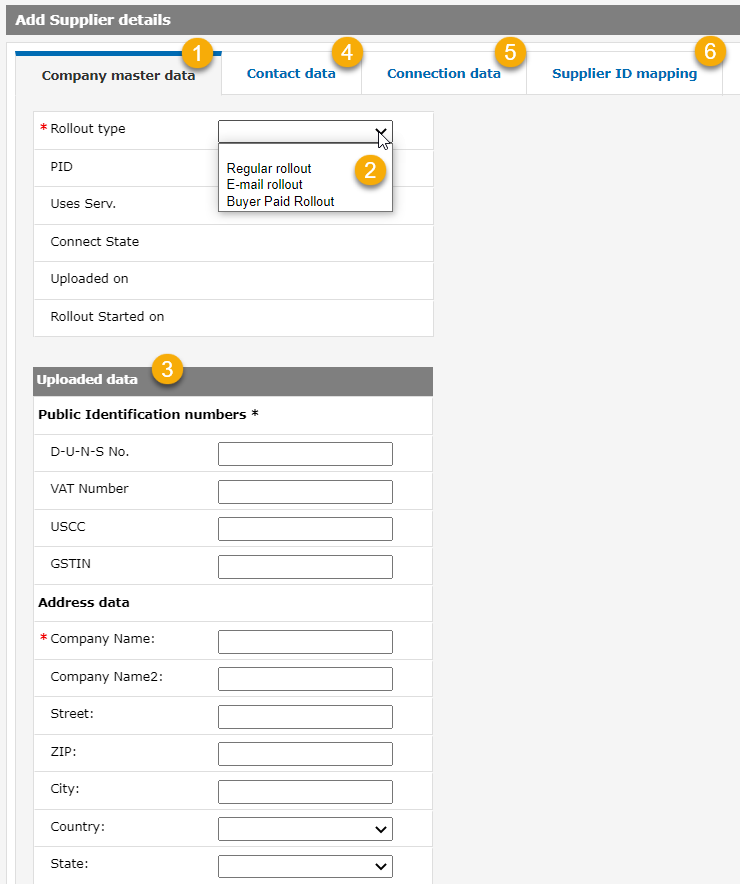
1. In the first tab you will enter the master data of the supplier. You have to select the Rollout Type first (Connect or Buyer Paid Supplier => point 2) and then you enter the required master data (point 3).
2. Please select the required ‘rollout type’.
=> Regular Rollout = Connect Supplier
=> E-Mail Rollout = Please do not use this rollout type as this service is no longer offered by SupplyOn. To offer your suppliers free use of the service, please use the Buyer Paid Connect.
=> Buyer Paid Rollout = Buyer Paid Supplier
3. Enter the supplier’s master data in the fields.
Important: There is at least one identification number per supplier mandatory.
A DUNS number is mandatory for the rollout of Connect Suppliers and Buyer Paid Supplier. If the supplier does not have a DUNS number yet, he can apply for a DUNS number via the link https://www.upik.de/en/. DUNS numbers are free of charge. It is free of charge and will take up to 4 weeks to receive it (2 weeks for European companies).
Alternative for DUNS: If you do not have a DUNS, you can use a VAT number (only in Europe). For Chinese supplier, you can use the USCC (Uniform Social Credit Code), certified by China’s Industrial and Commercial Bureau.
Buyer Paid Connect
You also have the possibility to pay the monthly Connect fees for your supplier. In order to do so you need first the role SLMBuyerLowBusiness. Atfer this, please choose the Rollout type ‘buyer Paid Rollout’ in the tab ‘Company master data’ when adding a supplier manually or insert the number ‘3’ in the column ‘Rollout Type’ in the upload file. If you are interested in this option, please contact your SupplyOn Consultant or Account Manager, as it has to be unlocked by SupplyOn for you.
4. In this tab you have to enter the supplier’s contact information.

mandatory fields are:
=> One of your contact information has to be the ‘Main Contact’ on the supplier side, if you only enter one contact, this person will automatically be the ‘Main Contact’
=> First and Last Name
=> Email address
=> Phone Number
5. In the tab ‘Connection data’ you can enter either the buyer control point id (from SupplyOn System) or the buyside plant code information to automatically setup network links in the SupplyOn application, when you roll out your suppliers. The Plant Supplier ID is the supplier number from your internal system, and can contain leading zeros.

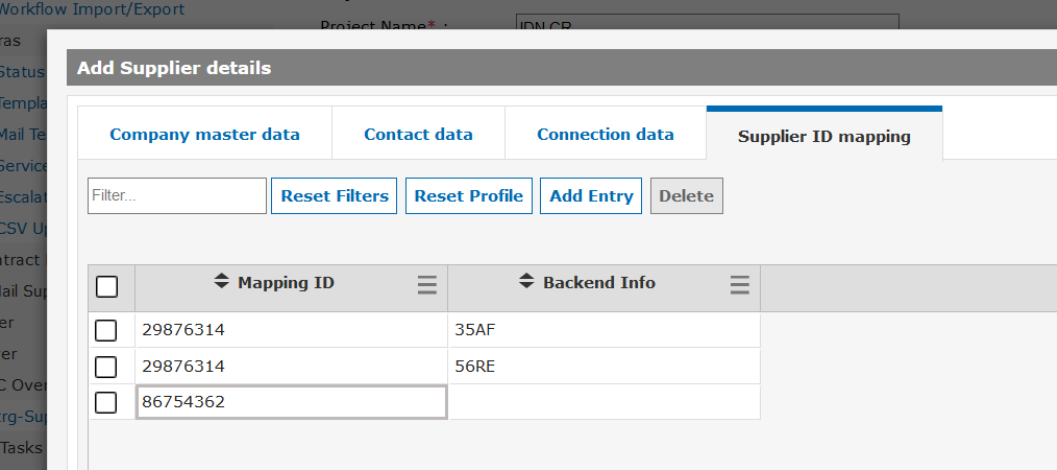
6. In the tab Supplier ID mapping, you have the possibility for several services to add multiple Supplier mapping IDs for a seller company during the mass rollout.
After you entered all your data and clicked Save you will see your data in the Wave Overview in the tab Supplier Rollout.
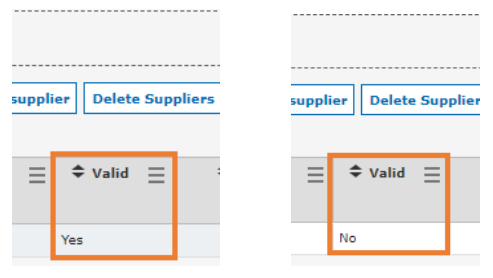
When you click Save, the system checks the vendor data for validation. If your data is correct and is consequently ready for the rollout, you will receive the status ‘YES’ in the column ‘Valid’. If your data is not correct, you will receive the status ‘NO’ in the column ‘Valid’. In this case, please check the error messages and correct your data to continue.
At the far right, you can see the three columns ‘PID’, ‘Uses Serv.’ And ‘Connect State’:
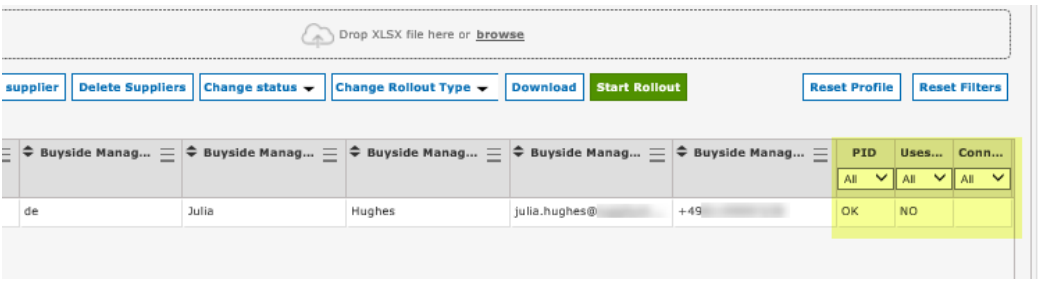
- The column ‘PID’ shows whether the supplier is already registered on the SupplyOn platform or not.
o The entry ‘OK’ means that the supplier is already registered with SupplyOn. If the column is empty, the supplier has not yet registered.
o The entry ‘Deactivated’ means that the supplier was active on the SupplyOn platform in the past, but has then been deactivated, i.e. is now in an inactive status. You can still start the registration for such a supplier. The system will check the deactivation reason. In case of a critical deactivation reason, SupplyOn will perform an internal check within 2 working days and either reject or release the rollout for the supplier. In case of a rejection, the buy side company will be informed accordingly. In case of an approval, the registration link to the supplier will be sent out automatically. - The column ‘Connect State’ shows whether the registration for a supplier has been started earlier, but has then been stopped. If this is the case, the entry in the column will be ‘Stopped’.
- The column ‘Uses Serv.’ informs you whether the supplier already uses the service, you would like to start the rollout for, with another buy side company on the SupplyOn platform. The entry ‘YES’ means that the supplier already uses the service with another buy side company, whereas ‘NO’ means that he does not.