SupplyOn AG SupplyOn Support Center

SupplyOn Support Center Menu

  • SupplyOn Support Center
  • SupplyOn Help Pages
  • English
    English Deutsch Français Español Italiano Português 日本語 繁體中文
Login
  1. Home
  2. SupplyOn Support Center

Start the Rollout

SupplyOn Rollout Cockpit

Start the Rollout

You have created your rollout project, entered or uploaded your suppliers and now you can start the rollout. How this works you can see in this article.

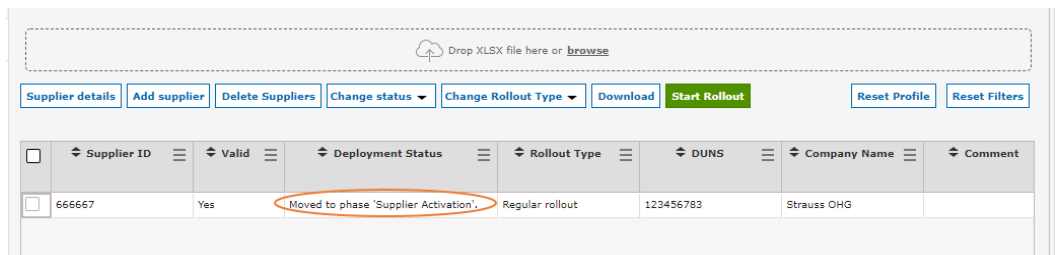
You can roll out all suppliers with status ‘YES’. Select the Suppliers you want to roll out by ticking the box at the far left and click on Start Rollout.

If you tick the ‘select all’ box in the menu bar, all suppliers will be selected but only the ones with status ‘YES’ will be rolled out.

ROC Guide Screen 6.6 - 03

After having successfully started the rollout for your suppliers, they will be moved to the ‘Supplier Activation’ tab:

ROC Guide Screen 6.6 - 02
ROC Guide Screen 6.6 - 01

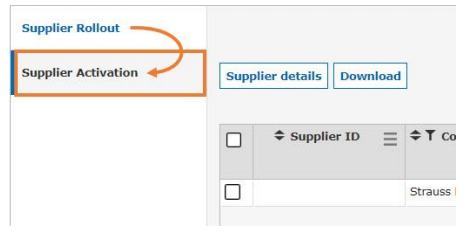
The ‘Supplier Activation’ Tab contains all suppliers of your current Wave, for which the rollout has been started successfully.

Please note: Each Wave has its own ‘Supplier Activation’ Tab. In case you would like to have an overview over all your open rollouts, across all Waves and/or Services, you have to go to the ‘Registration Overview’ in the Monitoring section (please see   Registration Overview for more information).

Was this article helpful?
Why wasn't this article helpful?

To contact the Support-Team please click here

  • Rollout Cockpit - Introduction
  • Access the SupplyOn Rollout Cockpit
    • Login to SupplyOn
    • Access the Rollout Cockpit
    • User Roles
  • Mass Supplier Rollout Tool
    • The Mass Supplier Rollout Overview
    • Organise and Manage this Overview
  • Rollout with the Tool
    • Create a Rollout Project
      • The Tab ‘Onboarding’
      • The Tab ‘Onboarding Phases’
      • The Tab ‘Logical File Names’
      • Email Templates in the Tab ‘Onboarding Phases’
    • Create a Rollout Wave
    • Upload/Add Supplier Data
      • Maximum Field Lengths
      • Verify Data
      • Manual Data Entry
      • Data Entry with Upload File
      • Possible Error Messages
    • Start the Rollout
    • Create Network Links
    • Create Mapping ID
  • What Happens After Start Rollout?
    • Automated Connect Booking - ACB (Already Registered Supplier)
    • E-mail notifications for suppliers
    • E-mail notifications for buyers
    • PID Registration – New Supplier
    • Joining a Contract
    • Booking a Service Connect (Already Registered Supplier)
  • Monitoring - General Overview
    • The Search Mask
    • The Result List
    • The Supplier Details Tabs - Service ‘Overview’
      • Tab ‘Comments’
      • Tab ‘Retention’
      • Tab ‘History’
      • Tab ‘Master Data’
      • Tab ‘CR Creation’
    • The Supplier Details Tabs - Specific SupplyOn Service
      • Tab ‘Buyer Paid Connect’
      • Tab ‘Escalation’
      • Tab ‘History’
      • Tab ‘Comments’
      • Tab ‘Contacts’
    • Monitoring - Specific Overviews
      • E-Mail Supplier Overview
      • Escalation Overview
      • Retention Overview
      • Registration Overview
      • Service Overview
      • Supplier Overview
  • My Tasks
  • Extras
    • Customized Email Templates
    • Retention Mailing
    • Flexible Fields
      • Assignment of Flexible Fields during the Rollout Process.
      • Create, Change and Delete Flexible Fields
      • Use Cases for Flexible Fields
      • Assign and Remove Flexible Fields to and from an Already Registered Supplier
    • Notifications
    • Service-Specific Contacts
    • Customer GTC Document Maintenance
  • Download Area
  • ROC Glossary

Footer EN

  • Contact
  • Imprint
  • Legal notes
  • Privacy policy
  • Security/Certificates

© SupplyOn AG